
Wednesday, 30 April 2014
Cores, Clouds and Flutterbys
Saturday, 26 April 2014
Knock Knock
So I now feel I have a lot more direction in what I need to accomplish before the holidays are out with EOF. Pretty much I need to be developing a basic ambient soundtrack for the game which we can build on and develop. I would like to collaborate with Chris Read on that as I liked some of the sounds he used in his recent Spatial Ambience project.
I also will be dedicating some time into making animated assets for our game environment. We played Fract today for inspiration and one thing in particular that I liked about it was the number of little things that were going on in the environment based on player proximity. When you walk around little shapes dance about or glow to indicate you're going in the right direction. Whether or not the assets I make are interactive for the player is yet to be decided. One such asset that will be interactive is the door concept I put forward:


I like this idea that the doors themselves are a tacky optical illusion. Based on Adrian's description of the game we should be able to poke fun at both the player and ourselves with these simple little visual tricks.
I also will be dedicating some time into making animated assets for our game environment. We played Fract today for inspiration and one thing in particular that I liked about it was the number of little things that were going on in the environment based on player proximity. When you walk around little shapes dance about or glow to indicate you're going in the right direction. Whether or not the assets I make are interactive for the player is yet to be decided. One such asset that will be interactive is the door concept I put forward:
Tuesday, 22 April 2014
Cube Creeps
Technically this is progress:
These little cube crabs would be a creep that appears throughout EOF. Whether or not they are incorporated into the puzzles or are just a creature that hangs around is yet to be decided. Either way, they're pretty cute.

Friday, 18 April 2014
Project 2b Reactionary Evolution - Post Submission Reflection
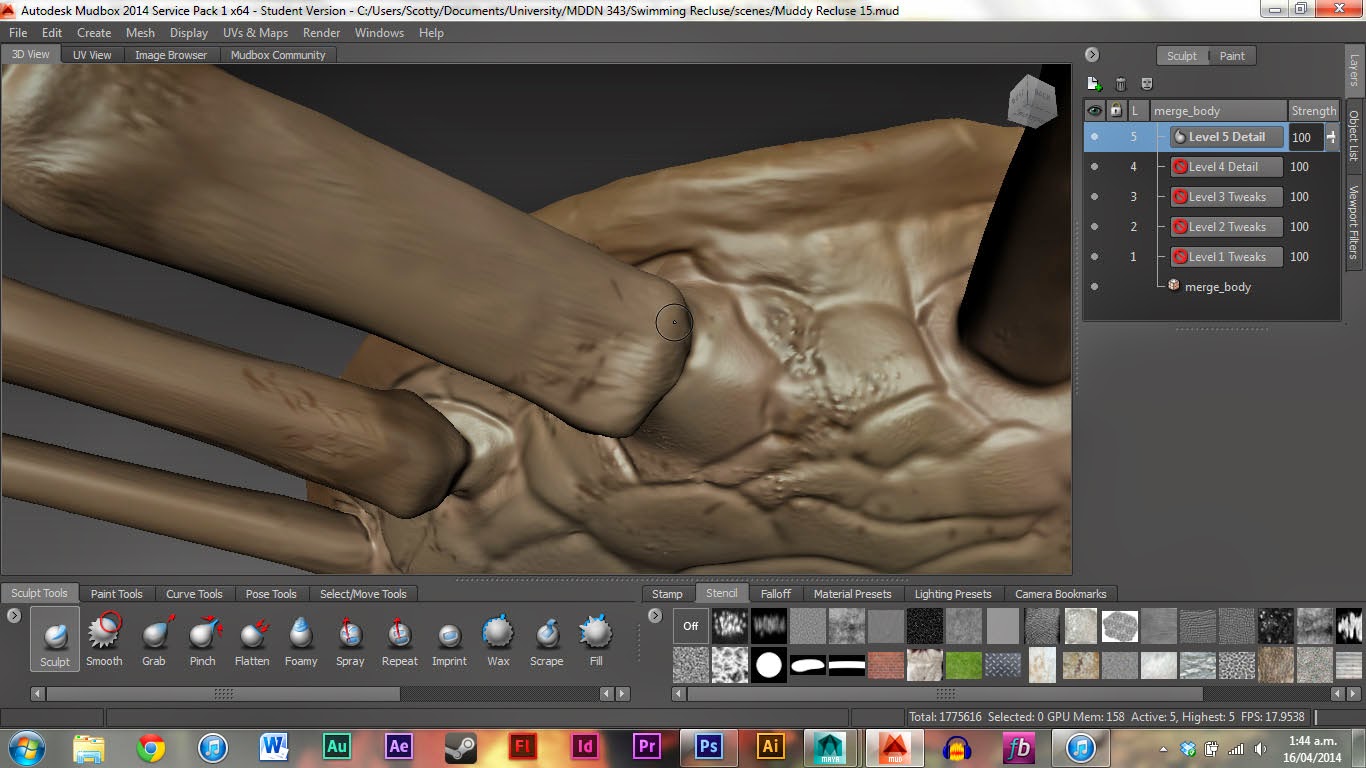
Today was submission day for Project 2b. Overall I am pleased with the final result. It certainly isn't perfect but the I am proud of how the model looks. If I was required to do the project again I would definitely be patient when creating the low poly model. As I needed to remodel mine it meant I had less time to work on the UVs and high poly details. The remodelling certainly allowed me to try out different tricks and methods for sculpting which were initially lost on my first model as I was trying to recall my skills from trimester one last year.


Before I rendered these out I experimented with importing the different levels from Mudbox into Maya but including the normal and ambient occlusion maps to see the different quality.
 |
| Level 1 |
 |
| Level 2 |
 |
| Level 3 |
 |
| Level 4 |
 |
| Level 5 |
 |
| Level 5 - no normal |
 |
| Level 1 |
 |
| Level 2 |
 |
| Level 3 |
 |
| Level 4 |
 |
| Level 5 |
 |
| Level 5 - no normal |
It is unfortunate that there is no place in this for EOF as it would be cool to refine it further with more time. Alas there is no room for it in the near future. My goal for work on EOF for the break is to begin producing draft soundtracks and sound effects. I figured that our aesthetic and code may change but if I can nail the feel of the game aurally then it is done and as final as we make it.
Wednesday, 16 April 2014
Puzzle Pieces
Everything is on its way to falling in place (touch wood). I have my low poly turntable animated above sand. Unfortunately the surface shader still refused to work but the video does its job anyway. I created my environment as a futuristic laboratory desk opposed to a coral reef because there was a period of confusion this morning. I had my completed Mudbox file rendering out all sorts of maps but applying them in Maya was like trying to assemble a puzzle without knowing what image to aim for. All the tutorials online I saw told me to do different things and it was all very confusing.


Initially I thought I would be unable to get the high poly detail onto my animated low poly mesh so I decided to change my environment to a lab desk where the swimming recluse would be posed for dissection with its aims spread out as I have in the high poly Mudbox file. Therefore I produced a simple environment for the recluse to exist in for the high poly turntable. Kah showed me the proper way to use my normal and ambient occlusion map through photoshop to produce a high detail, low poly model but at this point I was already attached to the lab environment so I stuck with it.
The renders of the HD-LP model don't show off the detail of the high poly model as much as I would have liked so for the print resolution images I'm going to use the high poly mesh in Maya (hopefully without crashing it) to get some nice close up shots of thee swimming recluse's carapace.
This is the difference at the moment. I intend to layer a specular map over the shell before doing the print renders but at this time they are still a little grainy looking.
Spiders Spiders Everywhere
In my clothes and in my hair. Now that I'm done with Mudbox it is time to start piecing everything together in Maya for the final renders. As usual Maya is throwing its toys like it'll win something but one must press on.


 I have a lot of respect for the Dirtycube now. Once I discovered the wonders of 1.7 million polys I was away laughing. Most of the textures I created came from combining different stencils from the default set plus one or two of my own. If I was to attempt this project again I would certainly look into obtaining my own photographs to turn into textures. Alas time has never been on my side (personally, I think it enjoys the competition).
Strangely enough whenever I exported the normal maps to put into Maya, Mudbox would cheekily "calculate tangential something-or-other" without my consent and my model ended up looking like this after. I didn't vote for this Mudbox, what are you doing? I looks like my spider was left on a rock to sunbathe and forgot to return to the water after a week.

 I suspect that these tangents are the culprits for the next few rendering abnormalities;


 Turns out no displacement map is better than anything else. These variations all come from playing with the alpha gain values. I found the formula for converting between Mudbox and Maya but unfortunately nowhere tells where to get the original value.
 So yeah, I'll have to be happy without it. Unfortunately the detail on the arms isn't coming out too well. Then again the only thing that really makes a brown recluse's legs interesting texture-wise are the hairs but the swimming recluse doesn't have hairs on its legs.


 These images are renders from Maya using my high poly normal map on my low poly mesh. It doesn't carry over the detail as well as I would have liked so I will continue to experiment. I have yet to apply an ambient occlusion map and I also will test bringing my high poly model directly into Maya to see if it will crash my computer or not.
I've also rendered out my low poly turntable. For whatever reason certain frames had graphical errors on them so I have a bit of re-rendering to do before it is perfect but that won't take long. One thing that didn't work no matter what I tried was rendering a surface shader that showed the wireframe of my low poly model. The tutorials online all agree on the same method and yet I get no wireframe...? Another thing I will be ditching is the complexity of the tail. The nCloth and spline combo was rejected by Unity consistently so I decided to remove both from the model entirely. It does make the tail look awkward but it is better than not having a model at all. There is the possibility that I could still create the webbing in a static high poly render but that would only come as a final touch. I would rather have the base expectations of my work done before trying anything as volatile as that.
Strangely enough whenever I exported the normal maps to put into Maya, Mudbox would cheekily "calculate tangential something-or-other" without my consent and my model ended up looking like this after. I didn't vote for this Mudbox, what are you doing? I looks like my spider was left on a rock to sunbathe and forgot to return to the water after a week.
I've also rendered out my low poly turntable. For whatever reason certain frames had graphical errors on them so I have a bit of re-rendering to do before it is perfect but that won't take long. One thing that didn't work no matter what I tried was rendering a surface shader that showed the wireframe of my low poly model. The tutorials online all agree on the same method and yet I get no wireframe...? Another thing I will be ditching is the complexity of the tail. The nCloth and spline combo was rejected by Unity consistently so I decided to remove both from the model entirely. It does make the tail look awkward but it is better than not having a model at all. There is the possibility that I could still create the webbing in a static high poly render but that would only come as a final touch. I would rather have the base expectations of my work done before trying anything as volatile as that.
Sunday, 13 April 2014
Playing with Mud
Over this weekend I've dedicated my weekend to getting my UVs done. I painted the textures in photoshop and stuck them on my low poly model. From there I was able to fix up the seams with relative success. There are a couple of intersections between three cuts which were a bit tricky to get the blend of colours perfect and I imagine better planning with splitting UVs could avoid such problems. Luckily it is minor enough I should be able to conceal it in Mudbox.

 Speaking of the Dirtycube, I have done some high-poly work and am getting a feel for the program. This is what I managed to accomplish today;


 I plan to add the eyes in Maya after completing my high poly model as a simple black blinn will accomplish the look I want for them and attaching them to the model prior is a nightmare. As far as the webbing is concerned I will try to get it done but it is low on my priority list as it will likely cause complications and is not entirely necessary.
For now I need to put my high poly model on hold as my Computer Science partner James has been unable to get my initial model to work in Unity and I suspect it is because of the nCloth deformer I used in the webbing. For this reason I need to animate my low poly model for him to use.
For now I need to put my high poly model on hold as my Computer Science partner James has been unable to get my initial model to work in Unity and I suspect it is because of the nCloth deformer I used in the webbing. For this reason I need to animate my low poly model for him to use.
Thursday, 10 April 2014
Plan of Action
Now that I have finished my base UVs I need to start working on the textures for my spider. The following images are variants of brown recluse spiders. As my swimming recluse is found in reefs and large rockpools the colouration of the shell would be coloured grey with brown and orange spots or highlights.


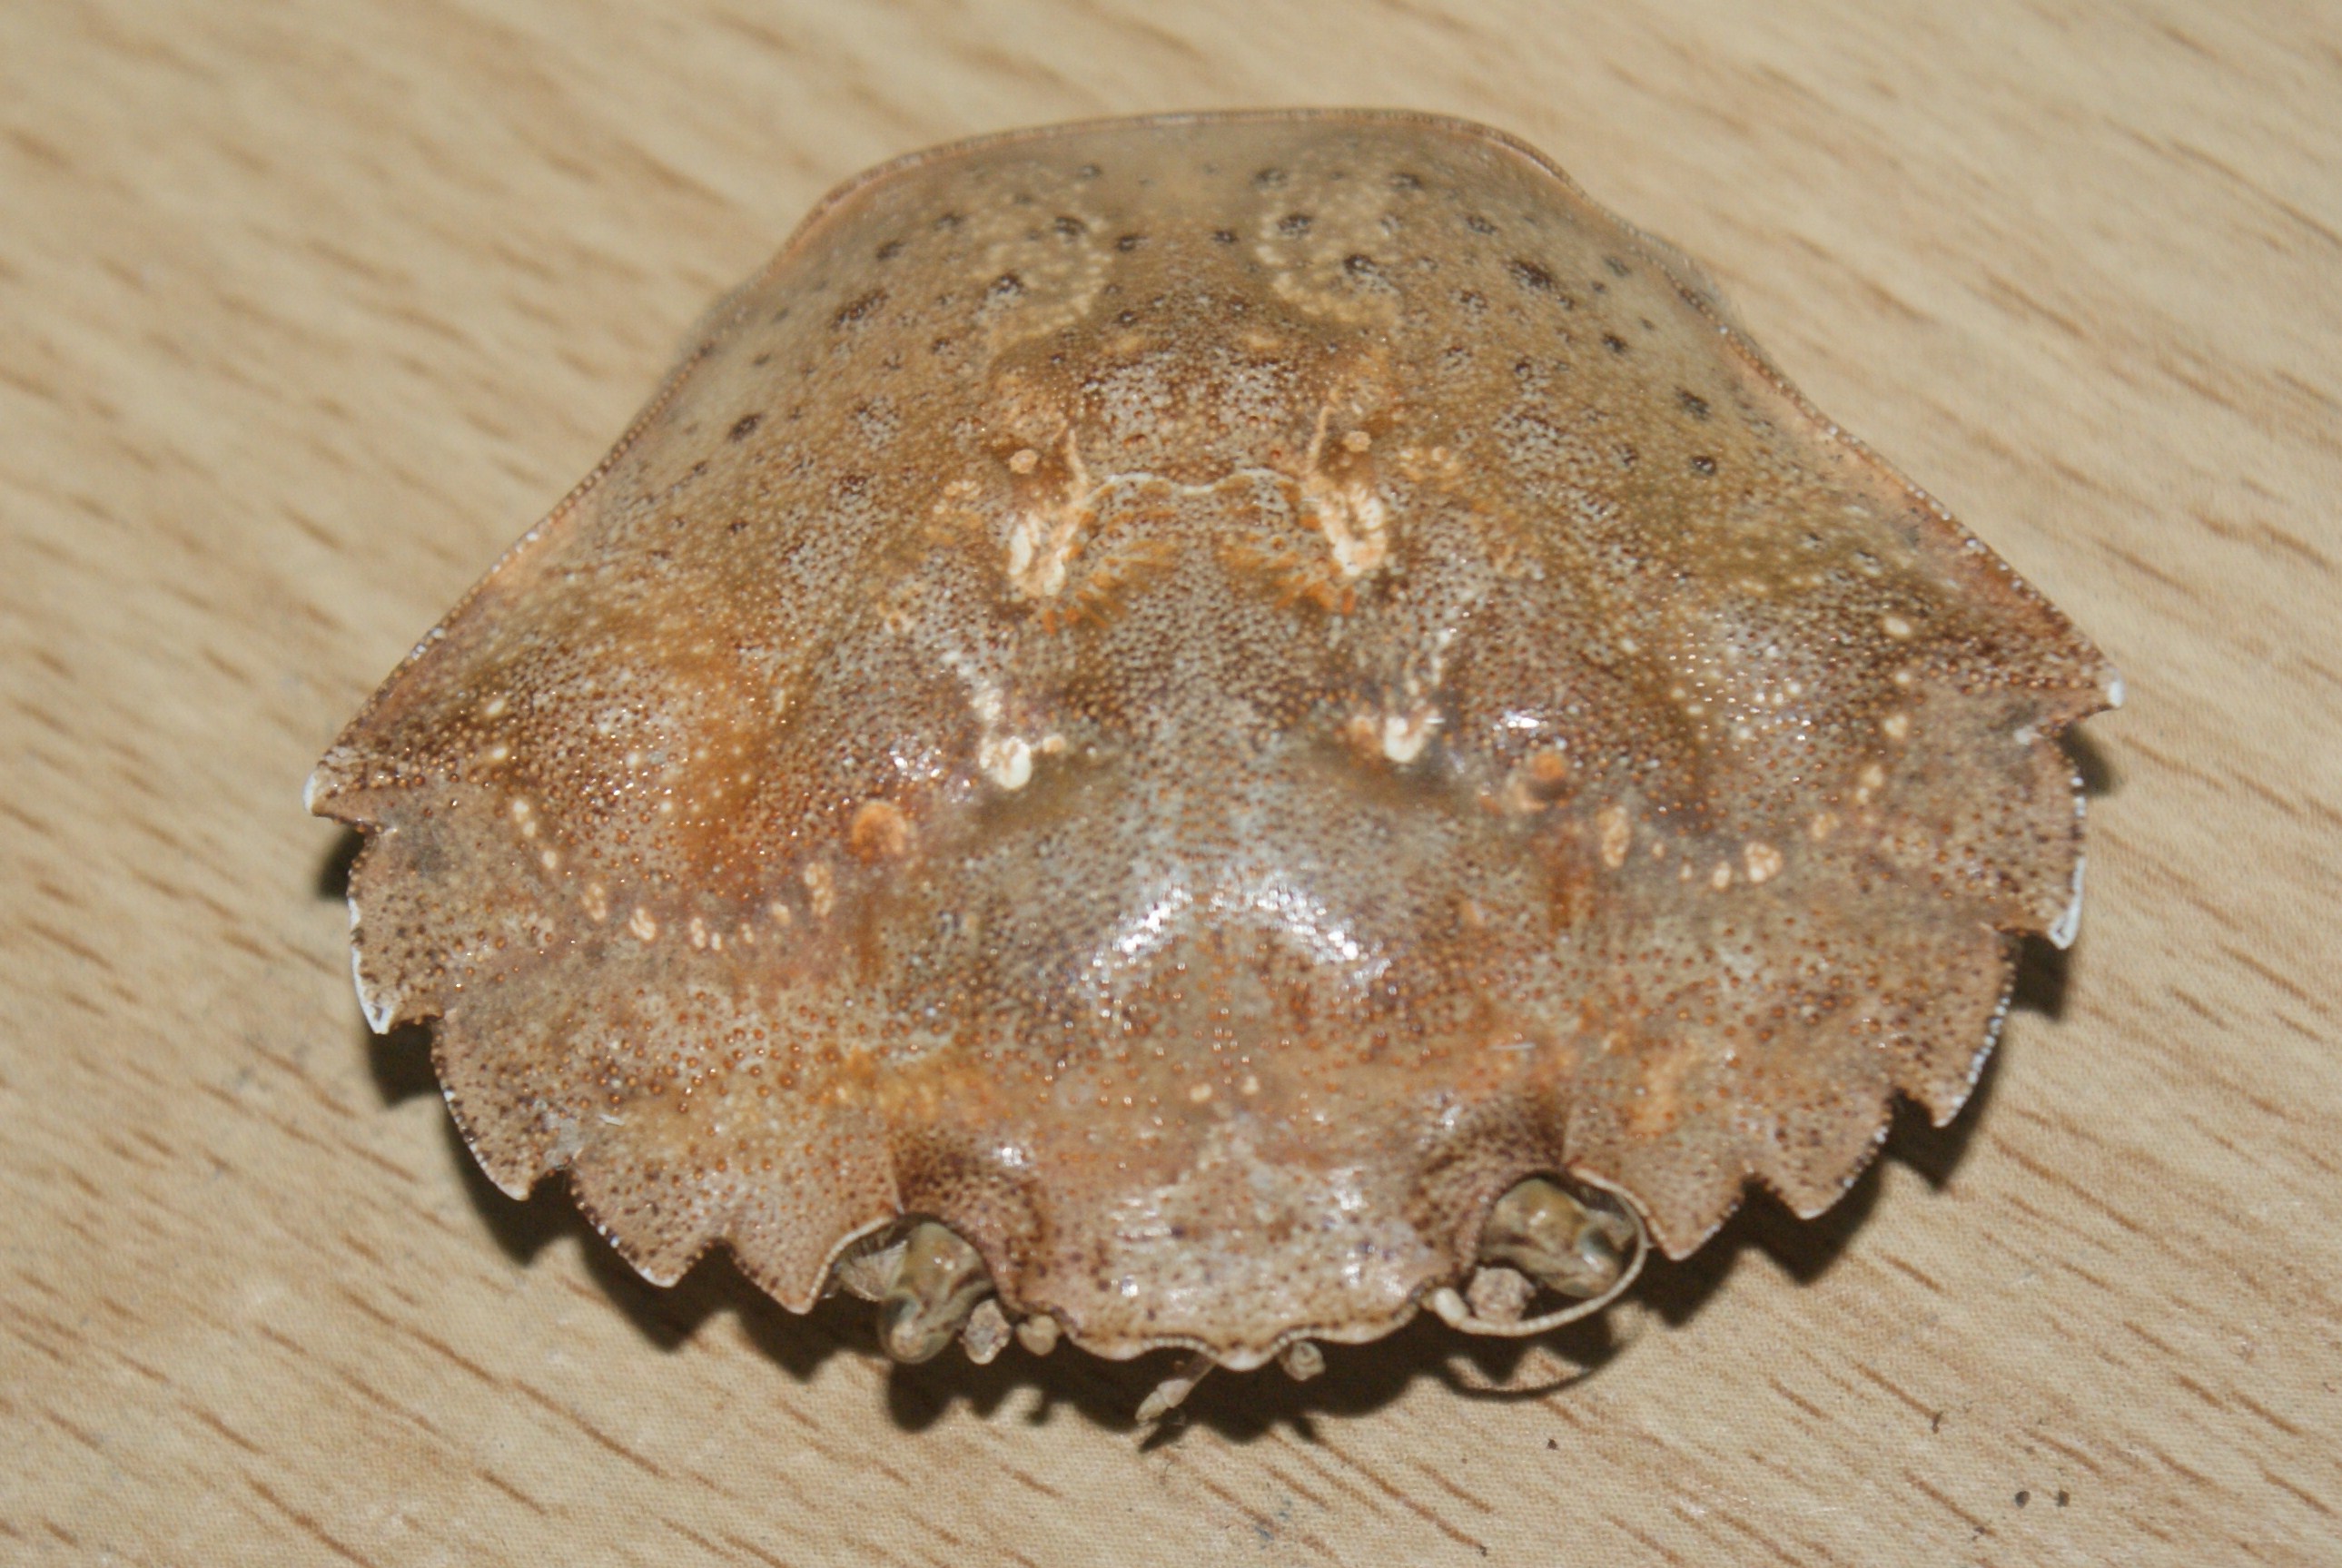

This kind of texture is what I'm looking for to put on the main shell.


Subscribe to:
Posts (Atom)